
Page 203 - LIT-18626-15-30
P. 203
SportsBoat_F7G11.book Page 191 Friday, May 24, 2024 6:06 PM
Care and storage
Chil Cool Technology vinyl upholstery (2) Disconnect the ground lead (black) and
Cleaning & Care the negative (–) battery lead (black).
Chil Cool Technology vinyl upholstery is a (3) Disconnect the positive (+) battery lead
new material that is cooler to the touch than (red).
standard marine vinyl. (4) Unfasten the battery strap, and then re-
Easy care is required to maintain its longevity move the battery from the boat.
and cooling properties.
(1) Mix a solution 30:1, (30 parts warm water 1
and 1 part mild NON-BLEACH liquid dish 4 1
soap).
(2) Apply and rub with a soft damp cloth. 2
(3) Rinse with clean warm water and wipe 4
dry. 2
3
Do use these or similar cleaners 3
Mild NON-bleach soap & water
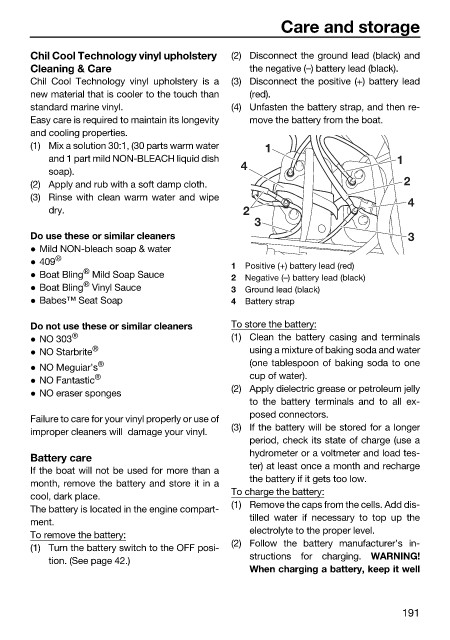
409 ® 1 Positive (+) battery lead (red)
®
Boat Bling Mild Soap Sauce 2 Negative (–) battery lead (black)
®
Boat Bling Vinyl Sauce 3 Ground lead (black)
Babes™ Seat Soap 4 Battery strap
Do not use these or similar cleaners To store the battery:
NO 303 ® (1) Clean the battery casing and terminals
NO Starbrite ® using a mixture of baking soda and water
® (one tablespoon of baking soda to one
NO Meguiar’s
® cup of water).
NO Fantastic
(2) Apply dielectric grease or petroleum jelly
NO eraser sponges
to the battery terminals and to all ex-
posed connectors.
Failure to care for your vinyl properly or use of
(3) If the battery will be stored for a longer
improper cleaners will damage your vinyl.
period, check its state of charge (use a
hydrometer or a voltmeter and load tes-
Battery care
ter) at least once a month and recharge
If the boat will not be used for more than a
the battery if it gets too low.
month, remove the battery and store it in a
To charge the battery:
cool, dark place.
(1) Remove the caps from the cells. Add dis-
The battery is located in the engine compart-
tilled water if necessary to top up the
ment.
electrolyte to the proper level.
To remove the battery:
(2) Follow the battery manufacturer’s in-
(1) Turn the battery switch to the OFF posi-
structions for charging. WARNING!
tion. (See page 42.)
When charging a battery, keep it well
191